Wednesday, December 12, 2007

Gamer Alert - Wall Street Journal Article


Here is a link to an excellent article published in the Wall Street Journal that discusses the rapid rise in the number of companies dedicated to proving physical models of virtual world through 3D printing.

Writer Robert Guth has done a great job of researching a wide variety of companies that promise to turn virtual web world models into physical models sitting on your desk. There is even a company dedicated to providing terrain models of actual world features for under $100! Want to climb Mt. McKinley? Print the model.

Electronic Arts is even getting into the 3D printing game. Check out the article at:

How 3-D Printing Figures To Turn Web Worlds Real

It just keeps getting better!

Monday, August 27, 2007

The Mobile Fab Lab is on the Road!


Ready, just in time for the Fab 4 Forum and Symposium the Mobil Fab Lab hit the road! Designed to demonstrate the power of personal fabrication, it began its first tour. Here is a link to a blog that talks about the portable Fab Lab.

www.thegoldenageofwireless.com

We'll try to follow the progress of the Mobile Fab Lab and keep you posted.

Friday, August 17, 2007

3D Software for 3D Printing Forums


We're very thankful to JANDSCREATIONS.COM for providing a forum where we can discuss 3D Modeling as it relates to Desktop 3D Printing. Visit the forums.

If Desktop 3D Printing is to become as popular as 2D printing, then a much wider range of users will need to feel comfortable with 3D modeling. The good news is that 3D modeling, for the first round of Desktop 3D Printers, can be created in much smaller packages than those required by gaming enthusiasts and 3D artists. Color materials, for instance won't be required until color 3D printers drop down to consumer level prices. Right now, the lowest cost color printer is just under $20K, so that will be a while.

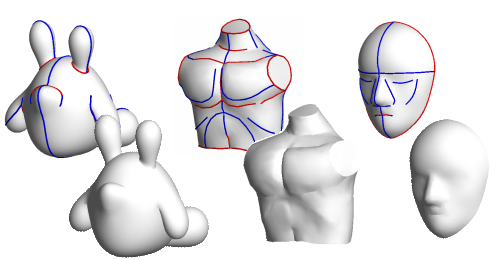
More importantly, the technical skills requirements for designing in 3D will have to be greatly lowered before there can be wide acceptance of 3D printing in homes. There are many people looking at this problem and some very promising technologies are beginning to surface. The image at the top of this article, for instance, shows FiberMesh, a collaborative research project between TU Berlin and The University of Tokyo.

The forums are 'Application Neutral' in that we want to explore easier technologies that can be applied across the application spectrum. So, if you have an interest in 3D printing, we urge you to join us in exploring some ideas to make it far easier for the general population enjoy 3D modeling

New Images on Desktop Factory Web Site

As the beta testing continues, Desktop Factory has added some new photos of the output of their desktop 3D printer. The latest images show some real improvements in the surface and success at printing more intricate designs. Layer alignment seems greatly improved in these new images.

Notice the size of the Maze and how smoothly the sides printed. Earlier samples showed some slight misalignment from layer to layer so these images represent some great news.

Here are some additional new images.

Drive Train Housing


Flexible Spring


As new images become available from Desktop Factory, we'll post them. In the meantime, you can see all of the available images by clinking on the "To see more samples, visit the Photo Gallery." link on the Product Page.

Fourth International Fab Lab Forum - August 22-23, 2007

The Fourth International Fab Lab Forum and Symposium on Digital Fabrication will be hosted in Chicago from August 22 to August 23, 2007.

Covering everything from nanoscale protein to large scale construction it draws researchers and industry leaders from around the world. The progam for the event can be found at:

Fab Lab Program

3D Printing is just one of the methodologies that will be discussed at the forum. CNC technologies, like the ShopBot are equally important to the worldwide availablity of fabrication tools. Lest, you think that fabrication research is dull and boring, my might want to check out this experiment at using the ShopBot to construct a boat.

Fjord Boat Buoy Challenge


Of course, fabricating a boat and keeping it afloat are two different challenges.


To see these and more images of fabrication experiments from the MIT FabLab, go to FabCentral.

Thursday, August 2, 2007

Desktop Factory now in Beta!


The July newsletter from the Desktop Factory indicates that beta machines are now in the field.

Desktop Factory Newsletter - July, 2007

This is great news.

At least one of the beta sites is guaranteed to give it a good workout. The Art Center College of Design in Pasadena, California has been using a variety of additive fabrication systems for some time and has wide experience with 3D printing. I know that Michael Berman and the rest of the faculty have been excited about the potential of the Desktop Factory for their students.

I'm extremely jealous!!

We now have both of the latest low-cost commercial desktop 3D printers now in beta which puts us one step closer to having them on our own desks!

Monday, June 25, 2007

V-FLASH Newsletter Announces Beta to Begin


We received an email this morning, from V-Flash, containing their latest newsletter. The bulk of the newsletter was dedicated to explaining why they chose to build the objects in an upside down orientation.

Why Upside Down?

The primary reason, of course, is that they use a photocurable liquid and if they didn't build upside down they would have to build the objects in a tank holding all the liquid. Obviously, that isn't the optimal solution if you've found another. And, they have, as you can see in the above illustration.

It's an ingenious solution that dips a sheet of film into a cartridge holding the liquid and pulls it back out, carrying a layer of the liquid on its surface. The hanging piece is lowered into the layer of liquid and some of the liquid is photo cured to create the next layer of the object. Any uncured liquid is simply carried back into the cartridge during the next build cycle.

This is a great technique for making the process both efficient of materials and clean. But, there are a few ramifications for designing a piece built in this way since there are no actual support materials. For most shapes where building a piece would require support materials if the piece were build right side up, there is no need for support with the upside down build. It's a great idea.

But, one of the benefits of 3D printing is having the ability to create pieces within pieces. A cage with an animal inside it would be an example. When building this type of piece in the V-Flash, without some minor revisions to the design, the animal would simply remain on the film. It's a simple fix. Simply add tiny breakaway sprues connecting the bottom of the animal to the bottom of the cage and break the sprue after the job is completed. The sprues have to be carefully located and easily broken; but, it's not a monumental problem.

Preparing for Beta

The big news in the newsletter, was that they are preparing to begin beta testing the V-Flash. This stopped us in our tracks since we had assumed that beta testing had been well underway given the announced target for delivery of the first units. It seemed to us that they were hinting that the delivery schedule might be slipping a bit. While we're as anxious as anyone to see desktop 3D printers arriving as soon as possible, we'd rather have the first users have a great experience with their new tools. So, whatever it takes to get it right, it takes.

Sample Parts Scarcity

No matter which of the new desktop units you are interested in, it takes a long time to create a part. Estimates are around 1" of height per hour. So, there aren't all that many parts being created, even if several machines are being run constantly.

We expect this shortage of sample parts to continue long after the units are in beta. But, even so, we hope to be able to be able to see a least some small samples of the V-Flash materials before the units are shipped, so that we can test its characteristics for you. We're already doing this with some materials created in the Desktop Factory 3D printer which will allow us to be able to help potential buyers and users with realistic expectations and suggestions for getting the most out of the printer based on these tests.

If you'd like to be put on the V-Flash newsletter mailing list here is the link.

V-Flash Newsletter Signup

In the meantime, we'll keep tracking for you!

Thursday, June 21, 2007

DC SIGGRAPH Looking forward to 3D Printing


The Washington, DC chapter of SIGGRAPH met this evening in anticipation of the annual SIGGRAPH meeting. So, the primary focus was on how to maximize one's time at SIGGRAPH because it's an enormous show and it's easy to become overwhelmed.

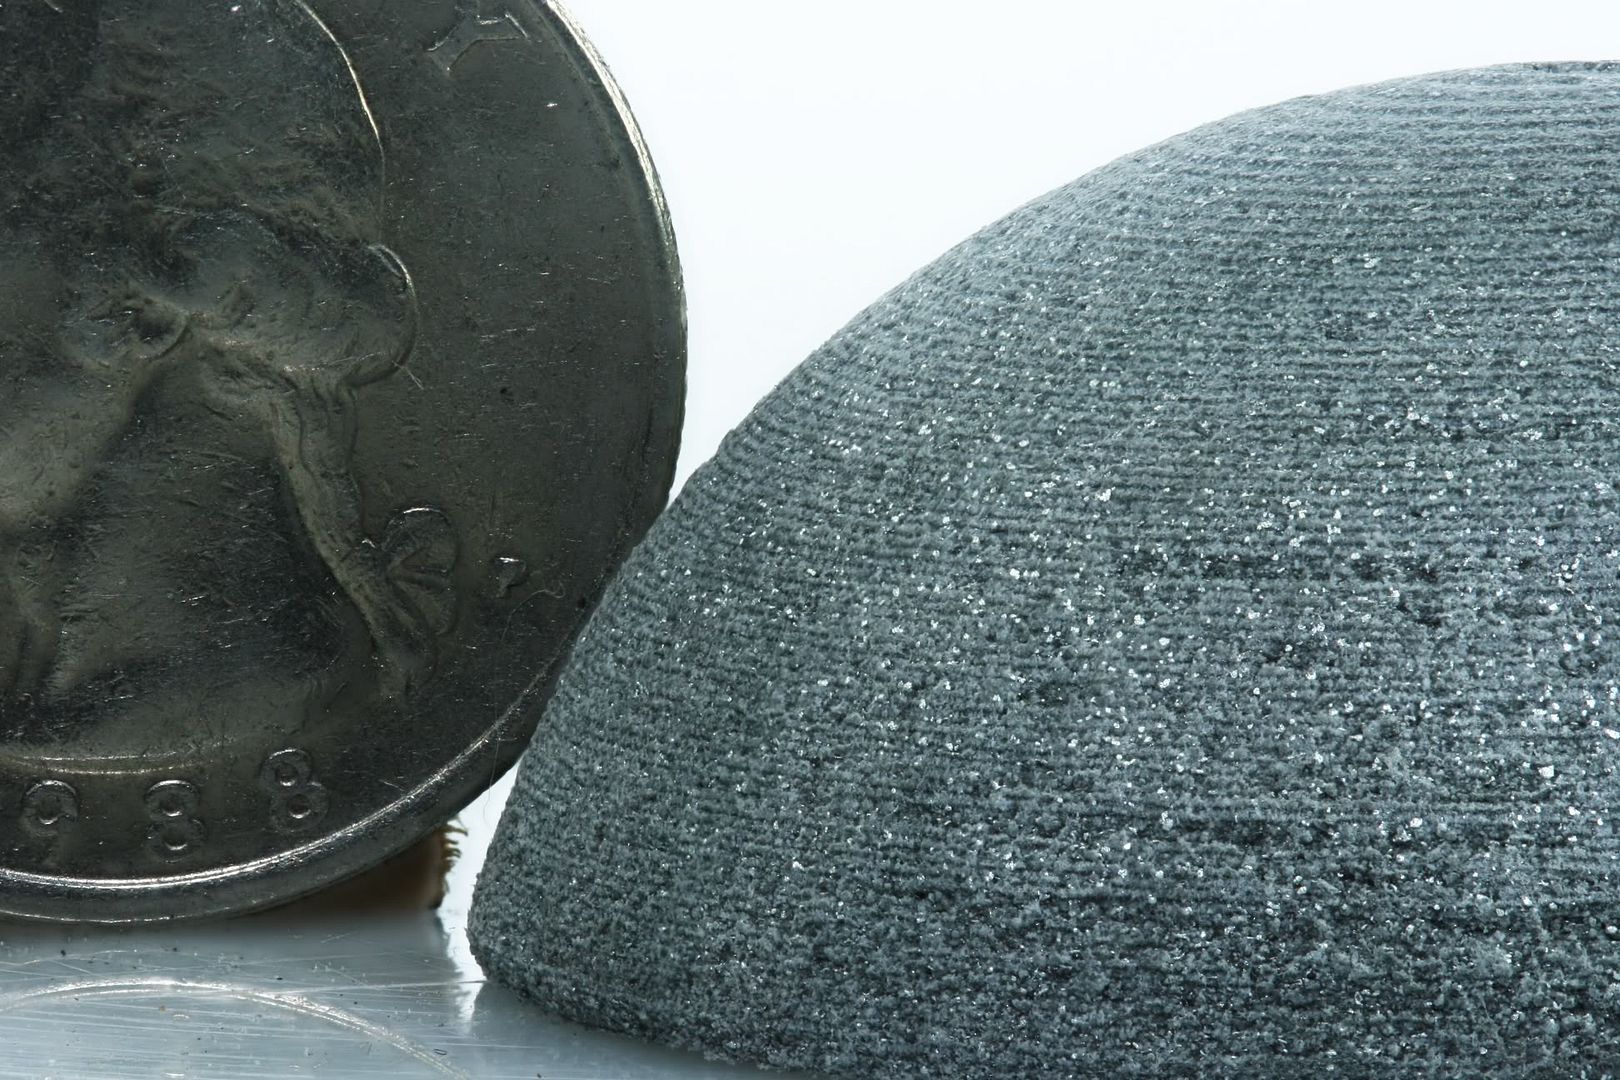
But, toward the end of the meeting, the attendees had the opportunity to view a single small object printed by an early prototype of the Desktop Factory 3D printer. It was a simple dome shaped test piece; but, it was enough to cause quite a stir!

It was very quickly apparent that many in the group feel that desktop 3D printers will open a wave of creativity that we can't fully comprehend. It was amazing to see how animated knowledgeable people become when they first see and handle the tangible output from a 3D printer... especially a piece that is as robust as the sample they were shown.

One of the goals in showing the piece was to find experienced 3D modelers wishing to experiment with and explore 3D printing when the first desktop units become available. And, there was certainly no shortage of volunteers. This is going to be fun.

The next few years promise to be very exciting and rewarding for 3D modelers. And, desktop 3D printing while be one of the primary creative forces behind the excitement.

While I'm showing the dome as they saw it, let me show you the SAME DOME that has been lightly sanded and painted with a silver metal flake paint used by plastic model makers.

Here is BEFORE sanding and painting.

and here AFTER light sanding and painting.

For a quick test, we think it turned out very, very well.

We were very pleased by how well the Desktop Factory material took paint. The paint used for this first test is a lacquer in the "Model Master - Custom Lacquer System" series by Testor. It's a spray paint called Sterling Silver Matallic 3D and can be found in almost any local hobby store.

Preparation was simple. The dome was lightly sanded with 340-1000 grit sandpaper and a base coat of grey lacquer primer was used. It was finished with a lacquer clear coat in the same Model Master series.

The bottom area could have been worked a bit more; but, we were anxious to see how it would turn out under paint. However, if you click on the second image to enlarge it you can see that, overall, it smoothed out extremely nicely. We're interested in artistic applications for desktop 3D printing. So, having a material that handles this well and takes paint so nicely is very exciting.

Tuesday, June 5, 2007

Desktop Factory's June 2007 Newsletter Online!


There is good news on the Desktop Factory front! Their June 2007 newsletter is now online and reveals the planned schedule for the next few months. See the June Newsletter and find more news links at:

Desktop Factory Newsletter June 2007

And, while you are there, check out the new web site with much better images and more complete information about the Desktop Factory product, company and goals. We're more excited than ever about the goals of Cathy Lewis and her team to bring desktop 3D printing into our homes.

New Desktop Factory Website

The breakthrough price of $4,995 and the target cost of $1 per cubic inch is extremely good news for educators and those of us interested in artistic applications for 3D printing. With each dollar we save in material costs, the more experimentation and learning we can do to help us capitalize on this exciting technology.

Well done!

Friday, June 1, 2007

Where IS that old Erector Set???

It's got to be around here SOMEWHERE!!! But, it would take us longer to find it than to build this wonderfully creative personal fabricator!
One of the great things about continuously doing web research for a blog is finding surprisingly delightful and slightly wacky creations like this personal fabricator that we found at:

http://blog.rebang.com/index.php?p=101

Note the GLUE GUN extruder!

Our kudos to Vik Olliver of Waitakere, New Zealand. We LOVE inventive people! Good work, Vik!

Thursday, May 31, 2007

V-Flash 3D Printer - Early Info & Specifications


As we sit here in the heat with a dead air conditioning compressor, which will take some steamy days to replace, we're wishing that the whole personal fabrication revolution was mature enough to allow us to build our own! But, we're not quite there yet.

We needed something to brighten our day. So, it was very welcome news to hear from Buddy Byrum, the product manager for V-Flash with answers to some questions we had about the V-Flash 3D printer. And, now we hope to make your day by sharing them!

The image, above, is of an item created with the V-Flash 3D Printer. From the stop motion animation the V-Flash web site (http://www.modelin3d.com/Vflash_animation.shtml) we already knew that objects were built from the bottom rather than adding top layers. Here's how it works.

  • A disposable pad having small break away supports is suspended from the build platform at the top of the build chamber.

  • A film, at the bottom of the build chamber, is retracted into a container of liquid photo curable resin where it is coated with the resin and then pulled out across the floor of the build chamber.

  • The disposable pad, or partially completed model, is lowered into or near the liquid resin on the film.

  • A light system photo cures selected portions of the resin to form a layer of the 3D object.

  • The build platform is pressed down onto the film and then lifts up.

  • The film is again retracted to pick up more resin and the process is repeated until the 3D object is completed.

  • The object and disposable pad are taken from the machine and separated.

The fact that the material used is a photo curable resin in liquid form rather than a powder should make this a very clean machine to operate in an office environment. The fact that the object is built from the bottom as it hangs, also means no waste of materials since no extra support materials are required. Any liquid not cured is reused. It is obvious that the V-Flash system is very efficient with material utilization.

Unlike some of the powder systems that use a sprayed binder, the parts come out of the machine fully cured and ready to use. (The Desktop Factory is also good in this regard because it binds its powder with heat rather than a sprayed liquid.) That being said, the V-Flash is being marketed as a concept modeler with material properties similar to general use SLA models. Of course, they are hoping to develop future materials that may actually be strong enough to be used for production pieces. Other future materials might have different color, flexibility or hardness properties. So, the technology looks very flexible.

We were not able to get firm estimates on material costs per cubit inch.

The detail resolution is .0088 inches. That translates to 114dpi in the 2D printing world. For most of the tasks for which it is being designed that should be plenty. But, if not, the printed objects can be sanded and printed. The material is said to take paint quite well.

None of the under $10K printers are speed demons. The V-Flash builds, vertically, at a rate of .06 to .75 inches an hour. But, remember, multiple items can be built at the same time provided they fit in the build chamber.

The unique hanging build technique does offer one design challenge. One of the capabilities of 3D printing system is that of building loose items within a cage or gears that are built right onto their shafts. In powder systems the loose powder or other disposable material is used to support these free floating items while being built. The V-Flash methodology will require the user to design small breakaway supports to hold the free floating items in place as the build is being processed. It's isn't a big thing; but, it is something that one has to consider when designing.

The software that will be delivered with the V-Flash system will accept .STL files and will be able to resize and reorient the models to be printed.

The ship dates are still expected to be early fall. Possibly September. So, it may be the first commercial 3D printer to break the under-$10K barrier. We are really looking forward to it. Again, thanks to Buddy Byrum for this helpful information!

Tuesday, May 29, 2007

The STL File. One way to get there from here.


It's one thing to have a 3D printer; but, it's not very useful unless you can send your part or masterpiece to it reliably. With so many different 3D formats being used somebody had to come up with an open standard that could be used as the common language between 3D modeling applications and the 3D printer.

While the software that drives some of the 3D printers are able to interpret .OBJ files, all of them, to the best of our knowledge, understand the .STL file format.

We recently found an excellent article on the STL file format that covers the topic in very clear terms.

Optimizing STL Output - ProtoType Magazine

We were surprised to learn that the file format goes back to 1987. And, the company that released it was 3D systems, the makers of the V-Flash Desktop 3D Printer! STL stands for STereoLithography. It's generally written as a text file; but, there is also a binary version.

In case you are interested, here is a sample of part of an .STL file:

solid C:\My Model

facet normal -0.799982 0.259131 0.541183
outer loop
vertex 4.87315 -1.83065 -0.0228412
vertex 4.828 -1.5632 -0.218208
vertex 4.69977 -1.74187 -0.320398

endloop

endfacet

.... Repeats for each facet .............
endsolid


As you can guess, STL files for complex shapes can be quite large since the vertexes of each tessellation (facet or triangle) must be thoroughly defined.

Monday, May 28, 2007

Beware the Evil Mad Scientist! (Calorie Alert!!!)


Wouldn't you know it. The industry hasn't even gotten started yet and already its got its own Evil Mad Scientist. And, this is one dastardy dude! His modus Operandi is to tempt the unwary into a stupifying sugar high by disquising his creations as 3D works of art.

And, it's DEFINITELY working! We aren't the only ones hoping that he'll find a way to commercialize the home-built Candy Fab 4000. Sugar junkies the world over are pulling for him.

Here is the main web site for this dispenser of evil calories.

Evil Mad Scientist's Web Site

But, don't stop there. You can wander on over to his images gallery... in the interest of science of course... and see just how enticing the output of that contraption can be!

Candy Fab 4000 Temptations

Aside from his obvious evil intentions, our Evil Mad Scientist is showing us that 3D printing and fabrication has an enormously wide range of new applications. He's an innovator and leader that has earned a place of honor on this blog. But, if he keeps riding THIS contraction, he may need to make a few sugar CASTS!!!

Actual Evil Mad Scientist's Risky Behavior

More than Chocolate! Cornell's Fab@Home


Our first encounter with the idea that one could actually own a 3D fabricator for under $10K was when we stumbled across the Fab@Home project's web site. Since then, a LOT more people have heard about this fascinating experiment in personal fabrication. Most of the attention, and rightly so, has gone to an enterprising high school student who created custom 3D chocolate confections using the Fab@Home system.

But, recently they've gone beyond that and actually created a flashlight housing. Dan Periard recieved the Fabber of the Month award for this design!

Dan Periard's Flashlight

The gallery of images of the things being made with the Fab@Home fabricator is a lot of fun to visit. The gallery is growing at a great rate and we're happy to see it.

Fab@Home Gallery

We found the Bouncy Ball images to be very encouraging. Not only do we lose ours under the furniture far too frequently; but, at our age that becomes their permanent home. But, more importantly, it shows that one can first create the tool (mold from frosting) and then create the toy in that mold. Pretty slick!

The other image that caught our attention was the Box in Cylinder. 3D Fabrication offers some very unque capabilities. Being able to build and enclose objects at the same time is an excellent example of one of those unique capabilities.

Making 3D Music With RepRap


OK, so it was a corny title. But, it's late and I had to write SOMETHING to go in that space!

This site is dedicated to any and all 3D printers or fabricators in the sub-$10K price threshold. That includes both commercially built products and those you can build yourself. The RepRap project falls into the latter category.

Most of the build-it-yourself systems use extrusion as the means for building a 3D object. This means that a wide variety of materials can be used. RepRap's goal is to build a system that can replicate itself... and they hope to be able to do so in 2008. It's certainly worth the time to check out their web site.

RepRap's Web Site

We'll have more detail on the project at a later time.

Friday, May 25, 2007

Bloggers helping Bloggers

One of the great things about Blogging is being introduced to other Bloggers having similar interests. An email arrived today from Michael Berman, the Senior Vice President and Chief Technology Officer for Pasadena's Art Center College of Design. He was letting us know that he was linking to one of our articles from his blog.

Visiting his blog was a real treat... and, turned up some excellent resources for learning more about Cornell's Fab@Home and Desktop Factories view of the future.

We could point you to the links we found on his site. But, we'd much rather you go there and enjoy the rich resources he's put together. Like we said before, it's a treat!

Michael Berman's Blog
Recent PBS Radio Interviews regarding 3D printing

Be a Visionary


In most of the posts you will note that the plural 'we' is used even though, at the moment at least, there is only one 'I' actually doing the writing. The use is 'we' is intentional because this blog is intended to be a place where many visionary people can contribute to our understanding of the soon-to-be rapidly growing desktop 3D printing phenomenon.

But, this post is a personal message from me to you. It's meant to encourage you to be a visionary when it comes to evaluating whether or not to invest in one of the first 3D machines. Vision is something that can be here one minute and gone another. Sometimes I've been a visionary and other times I missed opportunities due to lack of vision.

I vividly remember one such failure of vision. It was sometime in the early to mid 1970's when I was a young video producer. A man had called me to his office to make me a proposition. He explained that he was putting together a kit that would be used to create a home computer. The only problem was that he had no money and wanted me to create a training video to be paid for when sales came in.

I had previously worked with mainframe computers and simply could not fathom why anyone would ever want a computer in their home. What in the world would one do with such a thing? I passed, and it wasn't long before I realized that I'd let a great opportunity get by me for lack of vision. That was a very valuable lesson.

Fortunately, other opportunities to be a visionary came along. But, this time I was ready for it. By the late 1970's, it was beginning to dawn on me that a computer might be useful after all. In fact, it might help me with my video productions by creating titles and even animations. One day, as I was walking through a store I spotted a video game, the Bally Professional Arcade that included a programming language.

It was crude to say the least. Very crude. The best resolution it could deliver was just 160x100 and it dropped to 160x88 when Bally Basic was used to program it. Had I been in my non-visionary mode at the time, I would have simply dismissed it and walked away. But, fortunately, that happened to be one of the days when I was wearing my visionary hat. I bought it. And, thus began an extraordinary adventure.

While trying to learn all I could about the Bally, I found out about the DataMax UV-1 built on the same chipset; but, having twice the resolution... a whopping 320x200! It used a marvelous graphics and animation language called ZGrass by Dr. Tom DeFanti. I bought one.

This in turn lead to my being hired by Astrocade, the company that marketing the Bally Professional Arcade. Soon, I was traveling all over the US and Europe, going places and meeting people that I could never have dreamed. Within two years of my having the vision to see something special in that crude little video game system I'd sat playing video games with the CEOs of Hasbro, Fisher-Price, Quaker Oats, Marvel Comics, ITT, Standard Elecktrik - Pforzheim, etc. I'd been invited to an Omni Magazine birthday party for Isaak Isimov and, while I'm not much of a party animal, was whisked to the head of the line at Studio 54's Conan party to meet Arnold Schwarzenegger and Grace Jones.

And, it was ALL because on that particular day I didn't dismiss the video animation potential of a crude little game system. On that day, I was a visionary and my life would never be the same.

Why do I bring up this story?

Because I see that same opportunity, today, in the 3D fabrication kits and low-cost desktop printers that will be coming into the marketplace in the next few months. And, I hope that you will be a visionary as you evaluate them. Some are going to look at them and dismiss them as too crude or too slow. For some that will be an opportunity lost for ever.

But, for those that see beyond what these machines can't do... and, for those with the vision to push them to the limits... there can be exciting days ahead. For educators it might mean new ways to motivate students. For artists it might mean entirely new creative directions. For others it might even mean, like the Bally Professional Arcade did for me, an entirely new career and direction in life.

At the very least, follow this new industry as closely as you can. it's going places.

Thursday, May 24, 2007

Hear better via a Desktop 3D Printer!


We hate relying on news releases for information. They're so predictable... like there's a class that everyone goes to learn the rules for writing them and swears they will never deviate from the rules.

But, when a news release actually reveals a genuine tidbit of information then we're forced by our promise to keep you informed to at least give you a link.

3D Systems has announced that they are partnering with Dreve Otoplastik, a hearing aid manufacturer to deliver custom made hearing aid shells using a special version of the V-Flash 3D printer (Model HA 230). Now, this is some interesting news. It means that the resolution of the V-Flash actually IS smooth enough to create an item that can be comfortably worn inside one's ear. That's great news.

But, there is also another little tidbit of information contained in this release. Apparently, they will be able to achieve some level of multi-color delivery using swappable cartridges. While this isn't the same as having a full color Z450, it's certainly not a bad thing. The materials are being specially developed by Dreve Otoplastik.

Here's the link to the release.

V-Flash Hearing Aid Press Release

Since this particular machine will only be marketed through Dreve Otoplastik, it is not exactly the machine or materials that most of us would be using. Even so, the delivery time table and the little hints the article provides is encouraging news.

It Ain't Smoke and Mirrors!


Back in the early days of video games we were constantly hearing this rumor or that rumor, only to learn that it was all "Smoke & Mirrors". In other words, if it sounds too good the be true, it usually isn't.

We had our own lingering doubts about both of the low-cost 3D printers that are being promised for delivery in the next few months. If the V-Flash actually kicks out some parts in front of the crowd at EASTEC 2007 we can rest a little easier. We'll see.

But, on the Desktop Factory front, we're beginning to see some real movement. Visit their web site and then compare the sites' images with the parts you see here. It is evident that they have been very busy experimenting with ways to help their future users get the most out of their machines when they finally ship.

This image was very important for me. First, it tells me that the surface of the parts created in the Desktop Factory can be polished, smoothed and/or coated to a beautiful finish. Furthermore, they appear to take paint extremely well. Click in the above image and see if you don't observe a fingerprint in the silver gear. It takes a pretty shiny surface to show a fingerprint!

But, it also tells me that Desktop Factory is willing to show its warts, too. The first image that I posted on this blog of a Desktop Factory part came from this larger image. That item and others in the picture, while polished or painted, still reveal the original surface characteristics in interior areas. They could have turned them so it didn't show up; but, they didn't. That's class.

What is unclear is whether the surfaces were polished in some way or that the coating was simply used to smooth the surfaces. If anyone has any information as to how these items were processed please let us know. But, DON'T contact us about using the word "Ain't". We're from the South and Tom taught Science, not English!! Feel fortunate that we didn't use "Ain't Not"!

Yep! It's right around the corner and it truly ain't smoke and mirrors! We just wonder if Tom can actually clear off a large enough area on his desk by the time they are ready to ship. His wife is betting that he can't do it! But, we're pulling for him. There's a desk under there somewhere!!!

V-Flash at EASTEC 2007 Exposition


As this is being written the V-Flash 3D printer is being displayed on the exhibition floor at EASTEC 2007. We wish we were there. But, since we're not, we'll do our best to find someone that was.

The V-Flash 3D printer is expected to be released sometime this year at a cost of $9,900. We contacted the company and were subsequently contacted by a local distributer. But, they still don't have any real information to provide.

We'll keep trying. Maybe they'll have more after the show.

3D Systems does have a web site dedicated to the V-Flash 3D Printer. There are some intriquing glimpses into how it works in a short still-frame video. And, there is an image of a sample object. But, the image isn't fine enough for us to truly judge the character of the output. At 7"x9"x8", the build size of the V-Flash is larger than that of the 5"x5"x5" Desktop Factory.

Visit their web site at: http://www.modelin3d.com/

Desktop Factory Newsletter to be sent in June

One of the things I learned when inquiring about Desktop Factory information was that they will be sending out a their newsletter in June to those who have signed up for it. It's easy to sign up. Just go ther web site:

www.DesktopFactory.com

There is a place on the right side of the home page where you can register to receive the newsletter when it's sent out.

A first look at the Desktop Factory 3D Printer


The above image is from a larger image that we've obtained. It's a bit out of focus; but, useful none-the-less. It's a part that was printed in the Desktop Factory printer and then smoothed. What's revealing about this part, and why we decided to use it as the first image that we post of the output of the Desktop Factory, it that it also reveals the actual resolution of the unprocessed parts.

If you click on the image and look inside the hole for the shaft, you will be able to see that the surface is not nearly so smooth as the outside.

We've been told that the layers that the Desktop Factory lays down are 10 mils, and that the finest detail would be 40 mils (0.01 or 0.04 inches respectively). To see this in terms of dots per inch (dpi) in an inkjet printer it would mean that the layers are the equivalent of 100dpi and the finest resolved detail would be just 25dpi.

So, for our first desktop 3D printers, we need to be realistic about what they can and cannot achieve without any further processing. If we need very fine parts, then we'll have to turn to much more expensive solutions.

But, for many of us, the idea of being able to experiment at the conceptual stages of design development, at a low cost and under our direct control, is so appealing that even a low-res solution is better than no solution at all. Frankly, the cost of farming out 3D printing is just too expensive to allow much experimentation.

But, the photo reveals another interesting possibility. It appears that the material used in the Desktop Factory is very receptive to polishing or processing to achieve a finer finish. We don't see any pitting or scratching in the finished areas of the part which leads us to believe that it may be quite easy to work with.

How much work was done to achieve the smoothness of the finished part is not clear as yet. But, we're hoping to find out very soon. And, when we do, we'll certainly post our findings.

We're actually kind of impressed by what we see for the price.

3D Printing is Coming Your Way!


Make no mistake about it. 3D printing is on the way to our desktops.

This blog is being created as a place where we can follow the development of Desktop 3D as news and low cost products are released. Right now, we know about several potential candidates for that desk space now occupied by other, less fun, items.

Among the Build-It-Yourself candidates are the Fab@Home project (www.fabathome.com), RepRap (http://reprap.org). We even have an 'Evil Mad Scientist' creating a 3D printer that relies on sugar as the media! And, I'm sure more are on the way.

But, we'll also be following commercial 3D Printers. Two relatively low-cost 3D printers are nearing their target dates for shipping, Desktop Factory and the V-Flash from 3D systems. Information about both is rather sparse right now. But, we have been able to learn a few facts about the Desktop Factory and have obtained some new images which we will share. The image at the top of the post is the latest avaialable for the Desktop Factory.

We understand that the Desktop Factory is actually going to be introduced at the target price at $4,995. This quickly raised its profile on our radar screen! Initially they stated a range of between $5,000 and $7,500. That savings of $2,500 adds up to a lot of materials for experimentation! We like that.

There is something a bit odd about the image of the Desktop Factory printer that we obtained. The buttons and display just don't seem 'real' enough. And, we'd feel a bit better if there was some loose powder in the chamber. But, we'll take what we can get right now and this is the best we have at the moment.