Rescued!!!
The Thermistors arrived this afternoon. That was incredibly fast from the UK to the USA.
So, the countdown resumes and I can get back to building the RapMan 3.2 Extreme.
But, I want to take just a few minutes to talk about how pleased I've by the response of Ian and the Bit from Bytes team to my plight. It clearly was use error. Yet, there was no hesitation. They might have been THINKING about that dummy in the United States that messed up the job of crimping the Thermistor leads. But, if they were, they sure didn't show it.
I received not one; but, several emails of support. And, I REALLY appreciate that.
Now....
ON TO THE TASK AT HAND!
Monday, February 27, 2012
Thursday, February 23, 2012
RapMan 3.2: The Build Experience - Part 4
I crashed and burned at building the Hot End. And, it had absolutely NOTHING to do with either the quality of the parts or the quality of the documentation.
It had to do with aging eyesight. And, no kit can protect itself from that.
From reading on the web, I already knew that building your own hot end was THE most tricky part of the build process. And, when I opened the parts for the hot end build, I immediately understood why. They are small and they are delicate. That is NOT a good combination for fat fingers and less than perfect vision.
But, I pushed on, aided by a lighted magnifier.
The first hint of trouble came when my first crimp failed to hold and the smaller of the two wired being mated pulled out. Not good. A pure case of operator error and that put me one down when it came to the crimping ferrules. Also not good.
Fortunately, I was in video for years and have a lot of old parts around. So, with a little bit of rummaging around I managed to find what I hoped would be a suitable replacement. I have to say that I thought it was a BRILLIANT idea... even if the part I was trying to use was not exactly like the one I was trying to replace.
But, like many of my brightest and best ideas... especially those I get at the twilight of the day... this one turned out to be just a little less brilliant than first thought. As I crimped, the thermistor lead broke off less than a 1/4" from the thermistor. I was dead in the water.
So....
Now, I have a new plan. This one involves ordering a pre-built hot end. Now, THAT has GOT to be a brilliant idea. Especially, since they are not all that expensive. I'll let some young person, with great eyesight and a lot more experience, put together the hot end that I will count on to do what a RapMan printer is suppose to do.
But, I will not completely cop out. I hope to be able to obtain a thermistor or two and some ferrules and hop right back on the horse from which I have fallen, just to prove to myself that I can do it. The worse thing that can happen is that I end up with an extra hot end that may or may not live up to the quality and performance of the pre-built one.
In the meantime, I will move on to the rest of the build, as much as possible, so that when the hot end arrives it's ready to go to work immediately.
You can probably guess that it will be my recommendation to purchase one of the RapMan models that comes with the pre-built hot end... especially if your eyesight isn't what it used to be and/or you have fat fingers! :)
Thursday, February 16, 2012
RapMan 3.2: The Build Experience - Part 3
Back to building!
This time I want to focus on the quality and clarity of the RapMan 3.2 documentation. It is, in a word, EXCELLENT.
Here, for instance, is the documentation for the laser cut 5mm main panel parts sheet:

Every part is clearly color coded and labeled. The identification numbering system is very well thought out. And, differences between the model I have and previous models are also identified by color code so that I would not be looking for parts not included in my particular kit.
Even the contents of the small bag components are well identified by both ID and image.

Moving into the build itself, Bits from Bytes includes an extra touch to help minimize frustration. They've include parts and instructions to help the builder get the right feel for how to tighten bolts without putting too much stress on the plastic. Each step of the "Stress Test" is documented as completely and as clearly as all the subsequent build steps for real component building.

This kind of quality documentation is why the build manual is 149 pages long. They take incredible effort to be clear at every single step in the process. First there is the overview of the component complete with parts list and the location of the parts on the laser cut sheet.

Next comes a list of the tools that will be required to complete the assembly of the component along with any safety and build warnings associated with building the component. Note the alert that tells the builder to be very careful about making sure parts are not reversed.

Then comes a step-by-step description of the build process along with images matching the step order.

But, the REALLY cool part of the documentation is the 3D active content that allows you to rotate a 3D model to examine exactly what the finished component should look like from all angles. Here are two screen captures of a component being rotated.

 This is SERIOUSLY useful! And, it goes a long way to make a sizable project manageable!
This time I want to focus on the quality and clarity of the RapMan 3.2 documentation. It is, in a word, EXCELLENT.
Here, for instance, is the documentation for the laser cut 5mm main panel parts sheet:

Every part is clearly color coded and labeled. The identification numbering system is very well thought out. And, differences between the model I have and previous models are also identified by color code so that I would not be looking for parts not included in my particular kit.
Even the contents of the small bag components are well identified by both ID and image.
Moving into the build itself, Bits from Bytes includes an extra touch to help minimize frustration. They've include parts and instructions to help the builder get the right feel for how to tighten bolts without putting too much stress on the plastic. Each step of the "Stress Test" is documented as completely and as clearly as all the subsequent build steps for real component building.

This kind of quality documentation is why the build manual is 149 pages long. They take incredible effort to be clear at every single step in the process. First there is the overview of the component complete with parts list and the location of the parts on the laser cut sheet.

Next comes a list of the tools that will be required to complete the assembly of the component along with any safety and build warnings associated with building the component. Note the alert that tells the builder to be very careful about making sure parts are not reversed.

Then comes a step-by-step description of the build process along with images matching the step order.

But, the REALLY cool part of the documentation is the 3D active content that allows you to rotate a 3D model to examine exactly what the finished component should look like from all angles. Here are two screen captures of a component being rotated.


Wednesday, February 15, 2012
A Robot Respite While building
I got home late this evening and decided NOT to tackle the RapMan tonight. So, I'm going to take a little respite and tell you about a wonderful site that is sure to get your family excited about 3D printing.
Web Site Review: MY ROBOT NATION
Creating the Robots
I love to find things to do and places to go that make me a hero to my granddaughters. And, My Robot Nation fits that description to a tee. I first heard about it on my visit to 3D Systems, although, as far as I know there is no direct connection between the two companies other than the fact that My Robot Nation uses a Z-Corp color printer to print out the robots created by their customers. And, 3D Systems now owns Z-Corp.
Over the weekend, my two granddaughters each designed a robot. The first was QWERTY, clearly showing a flare for names.

The older granddaughter designed Henry. Again, displaying a highly honed sense of creative naming ability. They OBVIOUSLY take after their grandfather. No. Wait. They get good grades. So, maybe it's only in Robot Naming that they take after PopPop. At any rate, here's Henry.

From the look on Henry's face, he must know his name.
The interface for creating the robots was extremely easy for them to pick up and they enjoyed going through the many options that were offered to customer their robot. The process was just plain fun.
However, they have a Mac and initially we thought it wasn't going to work because the web site app requires WebGL. It turned out that WebGL is not turned on by default with Safari. Fortunately, My Robot Nation gives you guidance about how to turn it on. Once we did that, everything was wonderful.
They offer various sizes. Because we had never used them before I chose the 2" version at $17.99 plus $5.99 for shipping for each.
My Robot Nation's Order Confirmation
If creating the robot was fun, then reading the follow-up emails verifying our order and keeping us up to date with each step of the process has been even more fun.
We created the robots on Saturday and received the order confirmation with this nice affirmation for the creator of the robot. I cannot begin to tell you how much this meant to my granddaughter, even though it was obviously a 'canned' reply.
Your uniquely awesome robot creation, qwerty, has been successfully ordered and is on the way to the Robot Factory to be made real with full-color 3D printing!
They really know how to build community through their communication. And, frankly, that is as important to a child, or an adult who wants to look like a hero to that child as making the robot itself.
Off to Manufacturing...
By Sunday, we received notice that Querty and Henry were on their way to manufacturing. Again, it was highly affirmative for the creator. It's nice to be told that you did an awesome job.
We thought you'd like to know that your incredible creation, qwerty, is on its way to being made real RIGHT NOW with full color 3D printing at the My Robot Nation Robot Factory. Your unique robot blueprint goes into the 3D printer and awesomeness comes out: your robot, custom created for you in full color!
It's shipped!
By Wednesday, we received the news we'd been waiting to hear. Qwerty and Henry were on the way.
But, here is were I REALLY have t take my hat off to the My Robot Nation team. Not only did they fire off an equally affirmative message with the exciting news about shipping. They do so in style.
Woo hoo!! My Robot Nation is so excited to announce that your totally unique creation, Henry, has been made real and is on its way home to you!
Just take a look at the AWESOMENESS you brought into the world!
Your robot will be shipped out to you today, safely nestled in its protective packaging. It is perfect and beautiful when it ships from our factory, but if something ghastly happens in transit, please let us know immediately at orders@myrobotnation.com and let us help you!
That last paragraph, immediately tells me that they stand behind not only their work; but, their packaging and choice of shipper! The girls really liked seeing the image of the actual printed robot. And, I really liked the fact that at every step my granddaughter's creative efforts were so nicely acknowledged.
These won't be the last robots they create.
Take a look for yourself... http://www.myrobotnation.com
UPDATE: The Robots arrived within 7 days of ordering. Here they are hanging out together!

A nice experience at every step!
RapMan 3.2: The Build Experience - Part 2
Well... it didn't take me long to find out that living in the USA poses some challenges in building a product from a factory located in Great Britain.
It actually has nothing to do with Bits from Bytes and everything to do with the fact that the United States is still not a metric nation. Do you know how difficult it is to find a metric wrench under 6mm? I didn't either. But, I do now. So, I have some advice...
If you live in the USA and you order a RapMan printer, I urge you to also purchase the RapMan Custom tool kit that they also offer for sale. Doing so will save you a LOT of time, trouble and probably money.
But, if you have ordered the Kit and not already purchased the RapMan Toolkit, then I hope I can save you at least a little aggravation and time by pointing you to places where you can purchase the tools you need. Just don't expect to get them all in one place.
SMALL METRIC WRENCHES
Neither Sears, nor any of the big box hardware stores normally carry metric wrenches below 6mm. However, in some stores and online they do carry a Craftsmen 10 piece metric ignition wrench set. It includes sizes: 4, 4.5, 5, 5.5, 6 thru 11mm and sells for $19.99 at the time this is being written.

I found a single Sears store that carried this set within a radius of 50 miles from my zip code. So, I looked elsewhere.
There are a few hobby stores near me. And, I was able to find the a set of tools that contained 5 small box end wrenches in sizes 4.0mm, 4.5mm, 5.0mm. 5.5mm and 6.0 mm. The set is also sold through Amazon as the #60008 21 PIECE MINI;TOOL SET EXCEL.

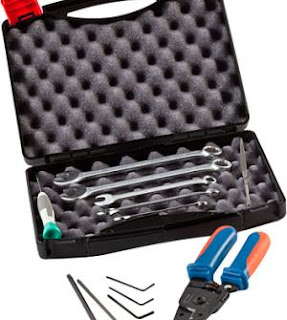
Fortunately, there is a Grainger near me and they just started carrying metric tools from ACU-MIN or Moody Tools. Here is the link to a set of 8 wrenches that cover sizes 2.5mm, 3mm, 3.2mm, 4mm, 5mm, 5.5mm, 6mm and 7mm. and what this set looks like.


This set is a higher quality than others and goes for $43.40.
Another alternative for metric box wrenches from 6mm and up are automotive stores. Here is a 6mm wrench by Autocraft that is sold through Advanced Auto Parts. This is part AC376 6mm wrench..

They can be purchased individually or in sets. Here is a set of metric wrenches that ranges from 8mm to 15mm.

Pricing on Autocraft parts varies, apparently, by location.
BALL-HEAD METRIC HEX WRENCHES
I could find metric hex wrenches relatively easily. However, that is NOT exactly what you need to complete a RapMan build. What you REALLY need are BALL-HEAD metric hex wrenches. And, finding these took me a lot of time and even more luck. I was looking for a set of small metric ignition wrenches when I went into Advanced Auto Parts. That is where I stumbled across a set of metric ball-head hex wrenches with every size that one needs to complete a RapMan build!
Finding the AC456 Autocraft 10-Piece Metric Hex Key Set Long Arm (Ball Head) made my day.

It includes the following sizes... 1.27mm, 1.5mm, 2mm, 2.5mm, 3mm, 4mm, 5mm, 6mm, 8mm 10mm. These cover, I believe, ALL the sizes we need to complete our build. The reason for the need of Ball-Head hex wrenches is due to the fact that some of the set screws that are used cannot be tightened from directly above. They have to be accessed from the side.
CONCLUSION
While it is possible to locate the proper tools to put together a RapMan 3D Printer in the USA, it is not as straightforward as it might be in Europe where metric is the standard for tools. So, ordering the RapMan custom tool set should save you a LOT of running around. And, it will put everything you need right in front of you in one compact package.
It actually has nothing to do with Bits from Bytes and everything to do with the fact that the United States is still not a metric nation. Do you know how difficult it is to find a metric wrench under 6mm? I didn't either. But, I do now. So, I have some advice...
If you live in the USA and you order a RapMan printer, I urge you to also purchase the RapMan Custom tool kit that they also offer for sale. Doing so will save you a LOT of time, trouble and probably money.

But, if you have ordered the Kit and not already purchased the RapMan Toolkit, then I hope I can save you at least a little aggravation and time by pointing you to places where you can purchase the tools you need. Just don't expect to get them all in one place.
SMALL METRIC WRENCHES
Neither Sears, nor any of the big box hardware stores normally carry metric wrenches below 6mm. However, in some stores and online they do carry a Craftsmen 10 piece metric ignition wrench set. It includes sizes: 4, 4.5, 5, 5.5, 6 thru 11mm and sells for $19.99 at the time this is being written.

I found a single Sears store that carried this set within a radius of 50 miles from my zip code. So, I looked elsewhere.
There are a few hobby stores near me. And, I was able to find the a set of tools that contained 5 small box end wrenches in sizes 4.0mm, 4.5mm, 5.0mm. 5.5mm and 6.0 mm. The set is also sold through Amazon as the #60008 21 PIECE MINI;TOOL SET EXCEL.

Fortunately, there is a Grainger near me and they just started carrying metric tools from ACU-MIN or Moody Tools. Here is the link to a set of 8 wrenches that cover sizes 2.5mm, 3mm, 3.2mm, 4mm, 5mm, 5.5mm, 6mm and 7mm. and what this set looks like.

This set is a higher quality than others and goes for $43.40.
Another alternative for metric box wrenches from 6mm and up are automotive stores. Here is a 6mm wrench by Autocraft that is sold through Advanced Auto Parts. This is part AC376 6mm wrench..
They can be purchased individually or in sets. Here is a set of metric wrenches that ranges from 8mm to 15mm.
Pricing on Autocraft parts varies, apparently, by location.
BALL-HEAD METRIC HEX WRENCHES
I could find metric hex wrenches relatively easily. However, that is NOT exactly what you need to complete a RapMan build. What you REALLY need are BALL-HEAD metric hex wrenches. And, finding these took me a lot of time and even more luck. I was looking for a set of small metric ignition wrenches when I went into Advanced Auto Parts. That is where I stumbled across a set of metric ball-head hex wrenches with every size that one needs to complete a RapMan build!
Finding the AC456 Autocraft 10-Piece Metric Hex Key Set Long Arm (Ball Head) made my day.
It includes the following sizes... 1.27mm, 1.5mm, 2mm, 2.5mm, 3mm, 4mm, 5mm, 6mm, 8mm 10mm. These cover, I believe, ALL the sizes we need to complete our build. The reason for the need of Ball-Head hex wrenches is due to the fact that some of the set screws that are used cannot be tightened from directly above. They have to be accessed from the side.
CONCLUSION
While it is possible to locate the proper tools to put together a RapMan 3D Printer in the USA, it is not as straightforward as it might be in Europe where metric is the standard for tools. So, ordering the RapMan custom tool set should save you a LOT of running around. And, it will put everything you need right in front of you in one compact package.
RapMan 3.2: The Build Experience - Part 1
While I have watched, for a long time, the development of the RepRap 3D printers, I resisted the urge to buy one because I'm more interested in PRINTING in 3D than BUILDING a 3D printer.
Let's face it. It IS quite an undertaking.
But, because I want to be ready for the Cube, when it arrives later this year, I thought it wise to bite the bullet, buy a RapMan 3.2 kit and build one. Had I opened the box before making the commitment to buy I think my instincts for laziness would have kicked in immediately and I would not have been writing this series of articles.
There are a LOT of parts in that box!!!
I had hoped that a friend, who is inclined to build things, would be able to help me out. But, he's busy building much more important things that will allow schools to send experiments into space. So, that evasive idea fell apart. Thus.... I forged ahead.
Thankfully, the documents and 3D active images that you can download from the Bit From Bytes site are very well done. And that helped boost my confidence a bit. But, it is STILL a big job. So, I decided that organizing the process was my only hope.
Craft stores carry small bags meant to sort beads. So, I purchased some of those to hold the parts and hardware. Using a Dymo LabelWriter printer, each part was labeled and bagged. Then I arranged the bags in order of the identification numbers in the RapMan documentation.

I felt this was more helpful than trying to find the parts in the sheets, from which they are cut, as I was building. The sheets are large and would also limit my build area. As it is, I am using a 4'x8' table along with two other small tables. As I said, there are a LOT of parts to a RapMan.
By the way, I also felt that it would ultimately save time if I put the correct bolt/washer/nut combinations together as I bagged the variously sized bolts so that I don't have to go hunting for the right combinations during the subsequent build process. In the USA, we are not as familiar with metric sizes. So, sorting ahead of time and having a separate bag for each size is probably going to be helpful.
I've finally gotten to the point where I THINK the task is organized enough to proceed. Sorting, as I have, also let me find that I'm missing one 3M Nylon washer, which I can easily pick up locally. And, it's also been helpful in identifying ALL the tools I will need to proceed. So, at least for now, taking the time to sort, bag and label seems like a good idea. We'll see how much it helps or hurts as I dive into the real work of building a RapMan.
And, that begins in earnest this evening. Wish me luck. I'll need it! :)
Subscribe to:
Posts (Atom)