Showing posts with label 3D Modeling. Show all posts

Tuesday, March 20, 2012

RapMan 3.2 Unattended Print at .250mm

UPDATE:  I did manage to figure out why the .125mm test was not, initially. printing well.  It didn't dawn on me that because the layers were 1/2 the thickness, I needed to raise the bed to compensate.  Once that was done, it was running fine when I left it this morning.  Hopefully, it completed the job.  I'll find out in an hour or so.  I HATE DC area traffic!  LOL!

Before leaving for home... and hopefully finding a higher resolution print of Peyton Duncan's Chow waiting for me... I managed to capture some better images of the printed model from my RapMan 3.2 printer.

Nobody is trying to fool anybody.  An extrusion printer doesn't cost $400,000.  Neither does it perform like one.  But, it still does a very credible job at rendering what one creates.  And, frankly, I'm quite pleased with the result at .250 vertical resolution.  So, here are some images.

NOTE:  Any lint, etc. comes from the fact that this poor guy spent all day in my pocket.  :)

Click on any image to see larger versions... 

Peyton Duncan - Chow View #1:  .250mm

Peyton Duncan - Chow View #2:  .250mm

Peyton Duncan - Chow View #3:  .250mm

Peyton Duncan - Chow View #4:  .250mm

Peyton Duncan - Chow View #5:  .250mm

For these next two images, which only appear to be identical, I raised the F-Stop for each to try to get a bit more depth of field.  I think it helped.

Peyton Duncan - Chow View #6:  .250mm f16.0

Peyton Duncan - Chow View #7:  .250mm f18.0
As you can see, the RapMan, once properly set up, begins to crank out some very nice 3D prints!  And, that is even at the Mid-resolution.

Note for Peyton...  I KNOW that is a DIME in the image and not a quarter as you asked.  How in the world did you think I might have a quarter to my name left while I'm spending all my money having fun buying tools and materials for my RapMan???   LOL!

Note for everyone else...  Peyton is my nephew.  And, I have a LOT of respect for his work and for him personally.  Both Peyton and my artist daughter Cheryl continue to amaze me with their talent. Here is just a sample of Cheryl's beautiful sculpture that got me interested into digital photography and  3D printing in the first place.

Fleurette by Cheryl Meeks


I'm surrounded by geniuses and loving it!

Now... I gotta get out of here to see what awaits me at home... a mess or a Chow!!  :)


Sunday, March 18, 2012

RapMan Reel Holder Using MOI 3D

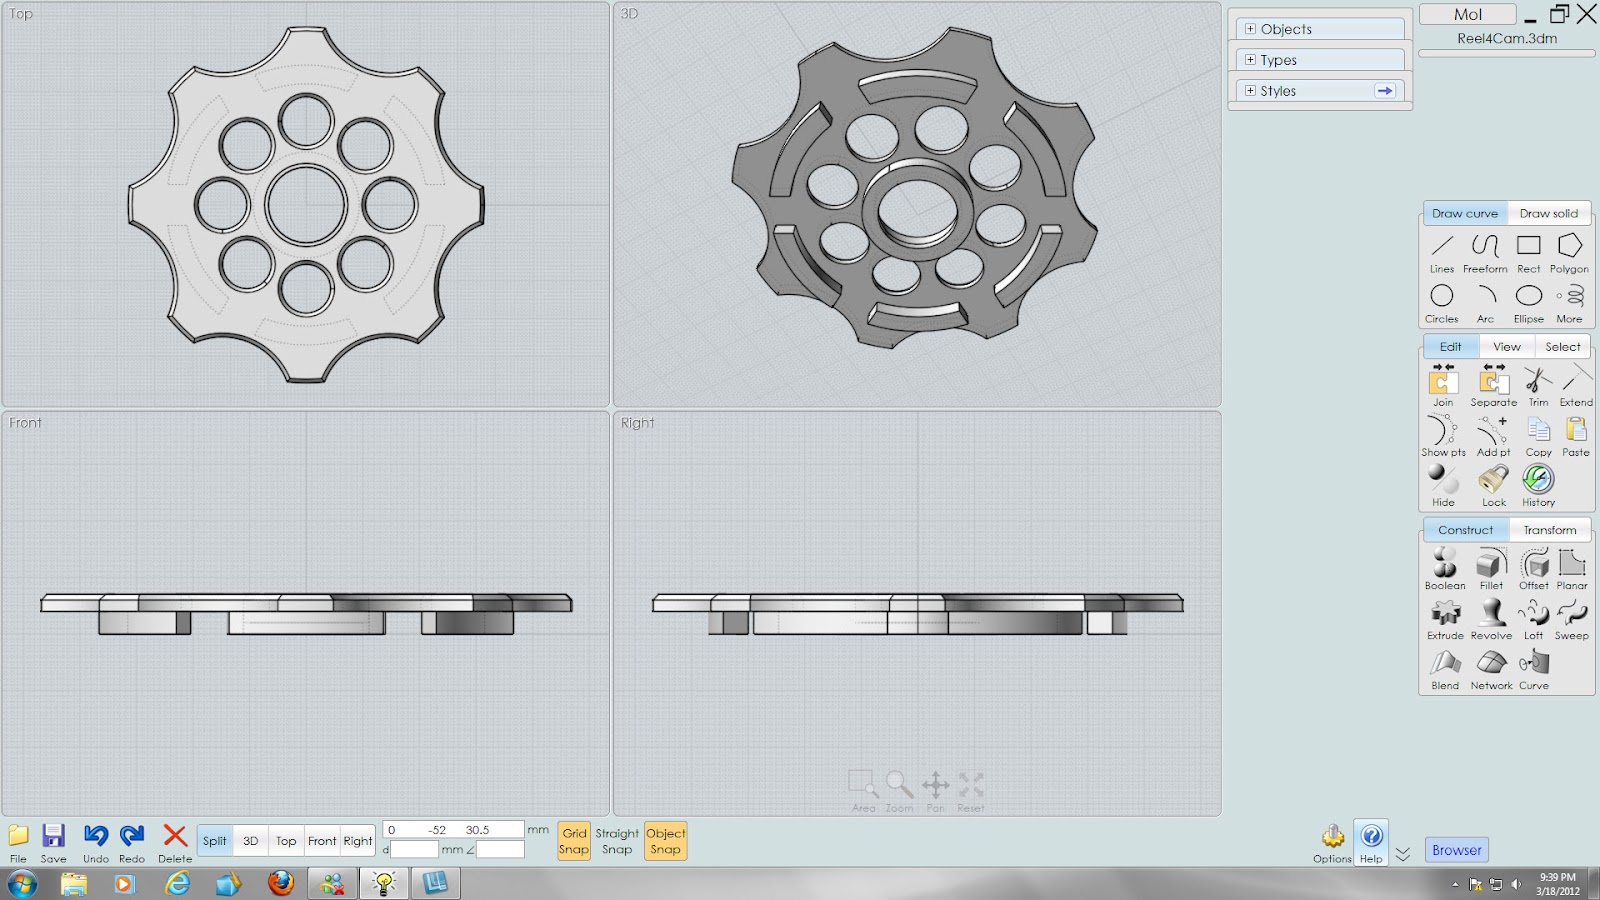
Moment of Inspiration, or MOI 3D, is an absolutely wonderful application.  I installed it two days ago and was immediately able to design some things that will be not only useful to me; but, other RapMan and RepRap users as well.

One of the things that became immediately apparent when my RapMan was completed was that unless I baby sat the printer, the filament would not feed well.  As soon as enough filament had been used that more should be unreeled, the drag simply was too much for my extruder.  That may or may not be the fault of my extruder roller pressure.   But, if so, with my lack of experience, I couldn't trust I would set it right.

So, I determined that roller bearings would probably solve the problem.  And, it did!  I cab now leave the printer unattended for hours on end without a failure to feed.  That was a MAJOR breakthrough!

So, I want to show you how MOI 3D enabled me to go from having absolutely NO experience with the program to creating hubs permitting me to use bearings to support my RapMan filament reel,  My first hub probably took an hour to an hour and a half.  All the subsequent designs took well under an hour and most less than a half hour.  This is remarkable since (1) I am NOT an artist; (2) I am NOT an engineer or draftsperson and (3) I'd not even seen this program before installing it.

I not only created one roller bearing hub.  I refined the design a number of times with different goals in mind,  MOI 3D allowed me the freedom to do this in very easy fashion.  Here is my first design.

First MOI 3D project.  A filament reel hub with roller bearing
As you can see, this is a relatively simple design.  But, it has some features that might not be apparent.  One feature is that it accommodates two different 8mm Inside Diameter bearing sizes, 16mm and 22mm.  This nested design was easy using MOI's Boolean operations that make it easy to remove material.  The lofted shape was accomplished using MOI's scaling.

I then felt I wanted a lighter weight hub.

Attempt at lighter hub using MOI 3D

This design definitely created a lighter version of the hub.  And, it retained the design allowing for a choice be two different sized bearings.  But, it did not allow me to use the 8mm bolt that came with the RapMan reel holder kit.  The bolt wasn't long enough.  So, I used a 5/16" threaded rod to see how it worked.

It worked BEAUTIFULLY.  What a difference!  The bearing allows the filament to be played out with no intervention by me at all.

But, if a hub was to be useful to a wider audience, it should probably be designed to be used with the bolt the user already has.  So, back to the drawing board.

Hub designed to work with the original reel holder bolt

 This design accomplished several goals.  First, it was light.  Secondly, it was designed so that the 8mm x 7mm x 22mm bearing I found at a hobby store would mount flush to the top of the hub.  This meant dropping the ability to also use a 8mm x 5mm x 16mm bearing.  But, the flush mounting was critical to being able to be used with the 8mm x 120mm bolt used with the RapMan Reel Holder.

Here is the above design being used to print the final design.  Note, too, that MOI 3D allowed me to design a base for the filament reel holder that keeps it locked into place.

Test Hub in use with original bolt


While the above design worked beautifully, I still felt that I could lighten the hub even further.  So, I came up with one more design.

Final RapMan Filament Reel hub Design

As you can see, this final design is very, very light.  Yet, it has turned out to be as effective as all the other designs.  Here is an image of the final product.

Final RapMan Filament Hub Printed

While I am very grateful that I was able to come up with something that allows my RapMan to run for hour on end with attention, I am even MORE grateful to have found MOI 3D.

Here is the final version of the reel hub being used with the RapMan filament reel holder, including the original bolt.


Final RapMan Filament Reel hub Design in the Reel holder


I will be putting up all these designs onto various sites.  The last design will be uploaded to 3D Systems' Cubify site that is now in beta.

I'm loving this software and printer combination.  And, I look forward to the new Cube when it arrives.


Monday, March 5, 2012

Bed Level Adjustment - Using the Test Duck

Once the build of the RapMan 3.2 is completed, it is time to try to optimize the print.  This generally involves two critical adjustments. 
  • Positioning the bed relative to the hot end (Distance)
  • Leveling the adjustable bed.
The most critical adjustment is the one that determines how high the hot end will be relative to the adjustable bed.  This is determined by the 70mm bolt attached to the extruder head.  It is better to start with the bolt fully extended.  Because if it is set too short, you will not only scrape the bed; but, you will melt it as well.  I'll go into this adjustment more fully when I can take some images of the extruder and bolt.

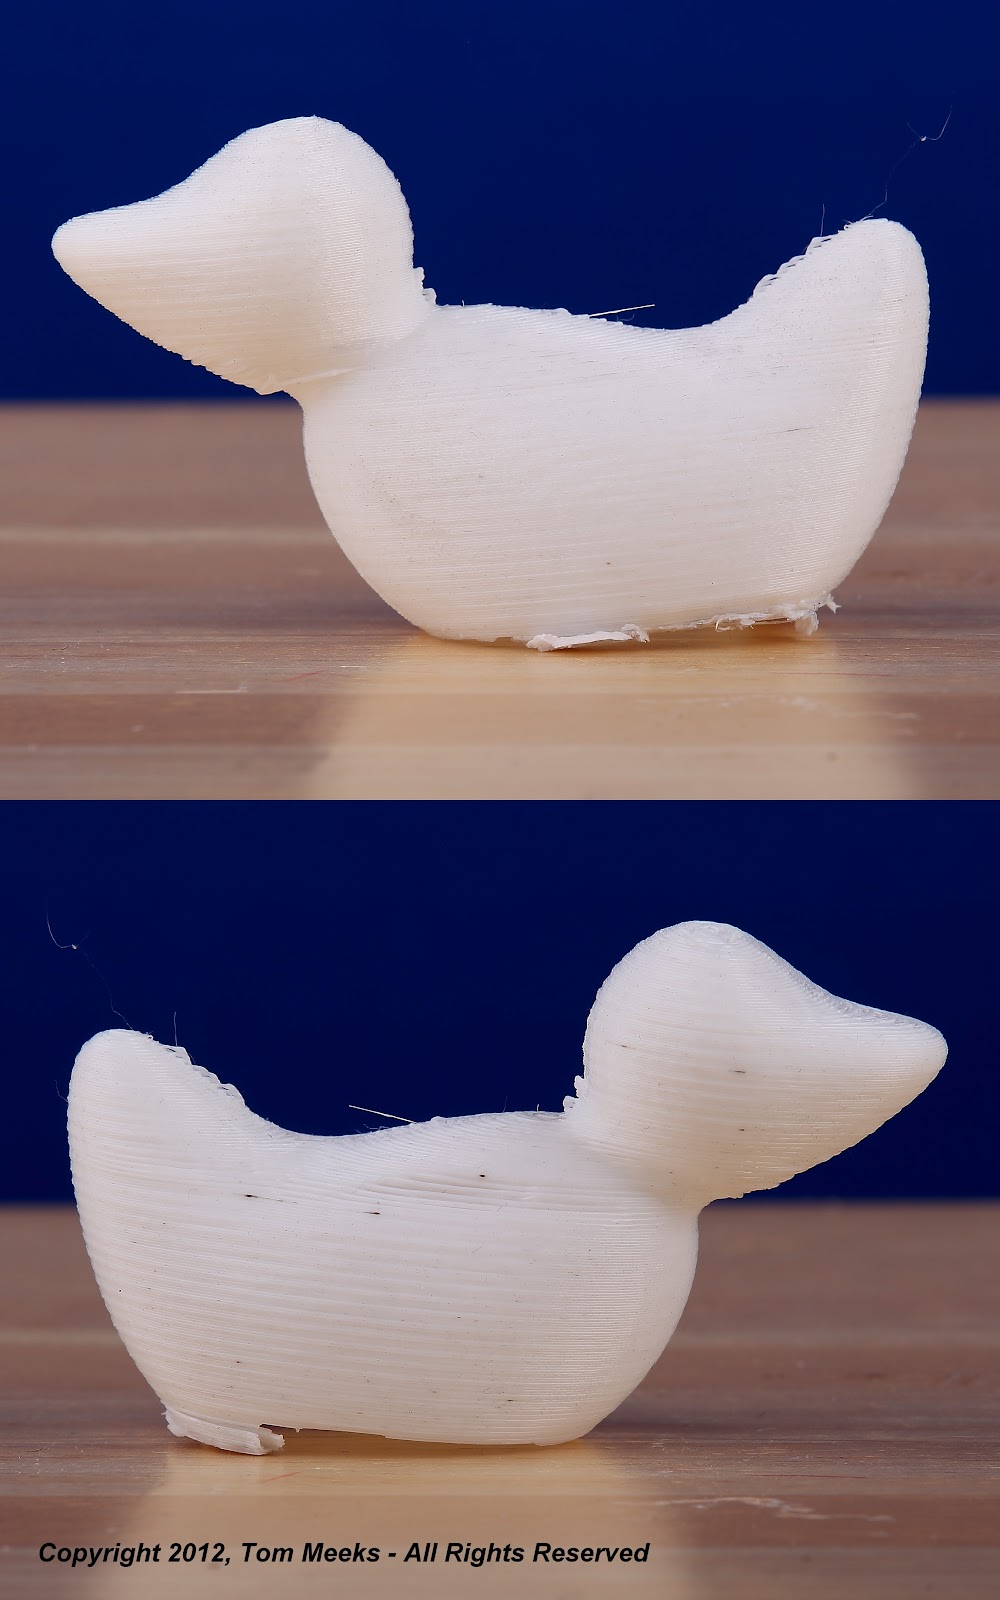
But, for now, I want to concentrate on the effect that an out of level bed will have on your prints.   We'll use the test duck that you can download from Bit From Bytes.

Here is my first attempt at printing the duck using the black filament that came with the kit.  I believe you should be able to see the images at full size by clicking on them.  Forgive the dust on the ducks.  They've been around a bit.  LOL!

Duck Test #1

The duck is printed facing to the left of the RapMan and it looked pretty good for a first print as I was watching it form.  But, when I removed the duck and took a look at the back side, it was apparent that I had a lot of work to do.  But, what was that work?  What made the back side bad and the front side good.

The first hint came as I looked inside the duck.  It's hard to photograph.  But, for each of the missing lines in the above image, there is a strand inside the duck that is unconnected.  The instinctive answer is to raise the back part of the adjustable bed, thinking that the gaps were caused by lack of adhesion.

Duck Test #2
So, using both bolts in the back of the adjustable bed, I raised the back one quarter turn on each bolt.  As you can see, it's better.  But, notice what happened to the raft.  It stuck to the table so firmly that I had to run out and buy a razor blade holder.  Even then I practically destroyed the duck in the process of removing it.

SO... I ADJUSTED THE BOLT ON THE EXTRUDER HEAD TO LOWER THE BED RELATIVE TO THE HOT END

Starting again, and thinking if a little good, then more is better, I loosened the bolts in the back a bit more.  WHOOAAAA!  NOT good, as you can see from the third test.

Duck Test #3

This was NOT due to adjusting the entire bed lower.  It was due to raising the back of the bed too much.
Of course, this prompted me to come up with a better way to level the entire bed before going on to the next test.  I will talk about the method I came up with in another post.  But, for now, it is enough to say that I came much closer to getting the bed level on the next pass.

Duck Test #4

Now, we are getting somewhere.  We are very close to honing in on the right bolt tension to level the bed.  But, as you can see, the back side of the duck STILL has some issues that are not apparent on the front side of the duck.

So, I loosened the back bolts by 1/6 of a turn on both sides.

Duck Test #5
At this point, it loos like we are going in the wrong direction.  But, pushing onward, it seemed like a good idea to adjust just one bolt, since the roughest parts were at the head end.  So, the left bolt was loosened another 1/6 turn.  And, another print was tried.

Duck Test #6

The great thing about this test, is that it made it apparent that bringing the bed up in the back was probably NOT the right solution.  In fact, it seems to be making the problem worse.  So, just before I left home this morning, I took the bolts back to their original position and TIGHTENED the back bolts by 1/6 turn.

We'll see how that works.  But, it is clear that leveling the bed is not only tricky; but, vital if we want to have perfect 3D prints.  And, observing the results above, my thinking is that LOWERING the back part of the best might result in smoother layers after all.  We'll see.

But, there is another observation I'd like to make.  That is the fact that looking at the raft for each duck can tell us a lot.


The raft at the right was created with Duck Test #3.  The black tint comes from the fact that there was some residual black left in the extruder.  The important thing to note with Duck #3 is how WIDE the raft filaments are in comparison with the other rafts.  This is because the hot end was too close to the best for that run.  And, it made it VERY difficult to remove.  By, test 5 I'd realized that the 70mm bolt should be lowered more.  But, the filament is still a little fat.  Test #6, was much better, except for a fat section as the print started.  I'm not sure why that happened.  But, both #5 and #6 were much easier to remove than earlier test runs.  It seems to me that a dedicated post related to what a raft might be able to tell us is in order.

But, for now, the leveling quest is continuing.  Stay tuned for tonight's result!  I've really enjoyed this quest and I hope it is helpful to all those trying to set up a RepRap or RapMan 3D printer.


Thursday, May 24, 2007

3D Printing is Coming Your Way!


Make no mistake about it. 3D printing is on the way to our desktops.

This blog is being created as a place where we can follow the development of Desktop 3D as news and low cost products are released. Right now, we know about several potential candidates for that desk space now occupied by other, less fun, items.

Among the Build-It-Yourself candidates are the Fab@Home project (www.fabathome.com), RepRap (http://reprap.org). We even have an 'Evil Mad Scientist' creating a 3D printer that relies on sugar as the media! And, I'm sure more are on the way.

But, we'll also be following commercial 3D Printers. Two relatively low-cost 3D printers are nearing their target dates for shipping, Desktop Factory and the V-Flash from 3D systems. Information about both is rather sparse right now. But, we have been able to learn a few facts about the Desktop Factory and have obtained some new images which we will share. The image at the top of the post is the latest avaialable for the Desktop Factory.

We understand that the Desktop Factory is actually going to be introduced at the target price at $4,995. This quickly raised its profile on our radar screen! Initially they stated a range of between $5,000 and $7,500. That savings of $2,500 adds up to a lot of materials for experimentation! We like that.

There is something a bit odd about the image of the Desktop Factory printer that we obtained. The buttons and display just don't seem 'real' enough. And, we'd feel a bit better if there was some loose powder in the chamber. But, we'll take what we can get right now and this is the best we have at the moment.