Showing posts with label RepRap. Show all posts

Monday, March 5, 2012

Bed Level Adjustment - Using the Test Duck

Once the build of the RapMan 3.2 is completed, it is time to try to optimize the print.  This generally involves two critical adjustments. 
  • Positioning the bed relative to the hot end (Distance)
  • Leveling the adjustable bed.
The most critical adjustment is the one that determines how high the hot end will be relative to the adjustable bed.  This is determined by the 70mm bolt attached to the extruder head.  It is better to start with the bolt fully extended.  Because if it is set too short, you will not only scrape the bed; but, you will melt it as well.  I'll go into this adjustment more fully when I can take some images of the extruder and bolt.

But, for now, I want to concentrate on the effect that an out of level bed will have on your prints.   We'll use the test duck that you can download from Bit From Bytes.

Here is my first attempt at printing the duck using the black filament that came with the kit.  I believe you should be able to see the images at full size by clicking on them.  Forgive the dust on the ducks.  They've been around a bit.  LOL!

Duck Test #1

The duck is printed facing to the left of the RapMan and it looked pretty good for a first print as I was watching it form.  But, when I removed the duck and took a look at the back side, it was apparent that I had a lot of work to do.  But, what was that work?  What made the back side bad and the front side good.

The first hint came as I looked inside the duck.  It's hard to photograph.  But, for each of the missing lines in the above image, there is a strand inside the duck that is unconnected.  The instinctive answer is to raise the back part of the adjustable bed, thinking that the gaps were caused by lack of adhesion.
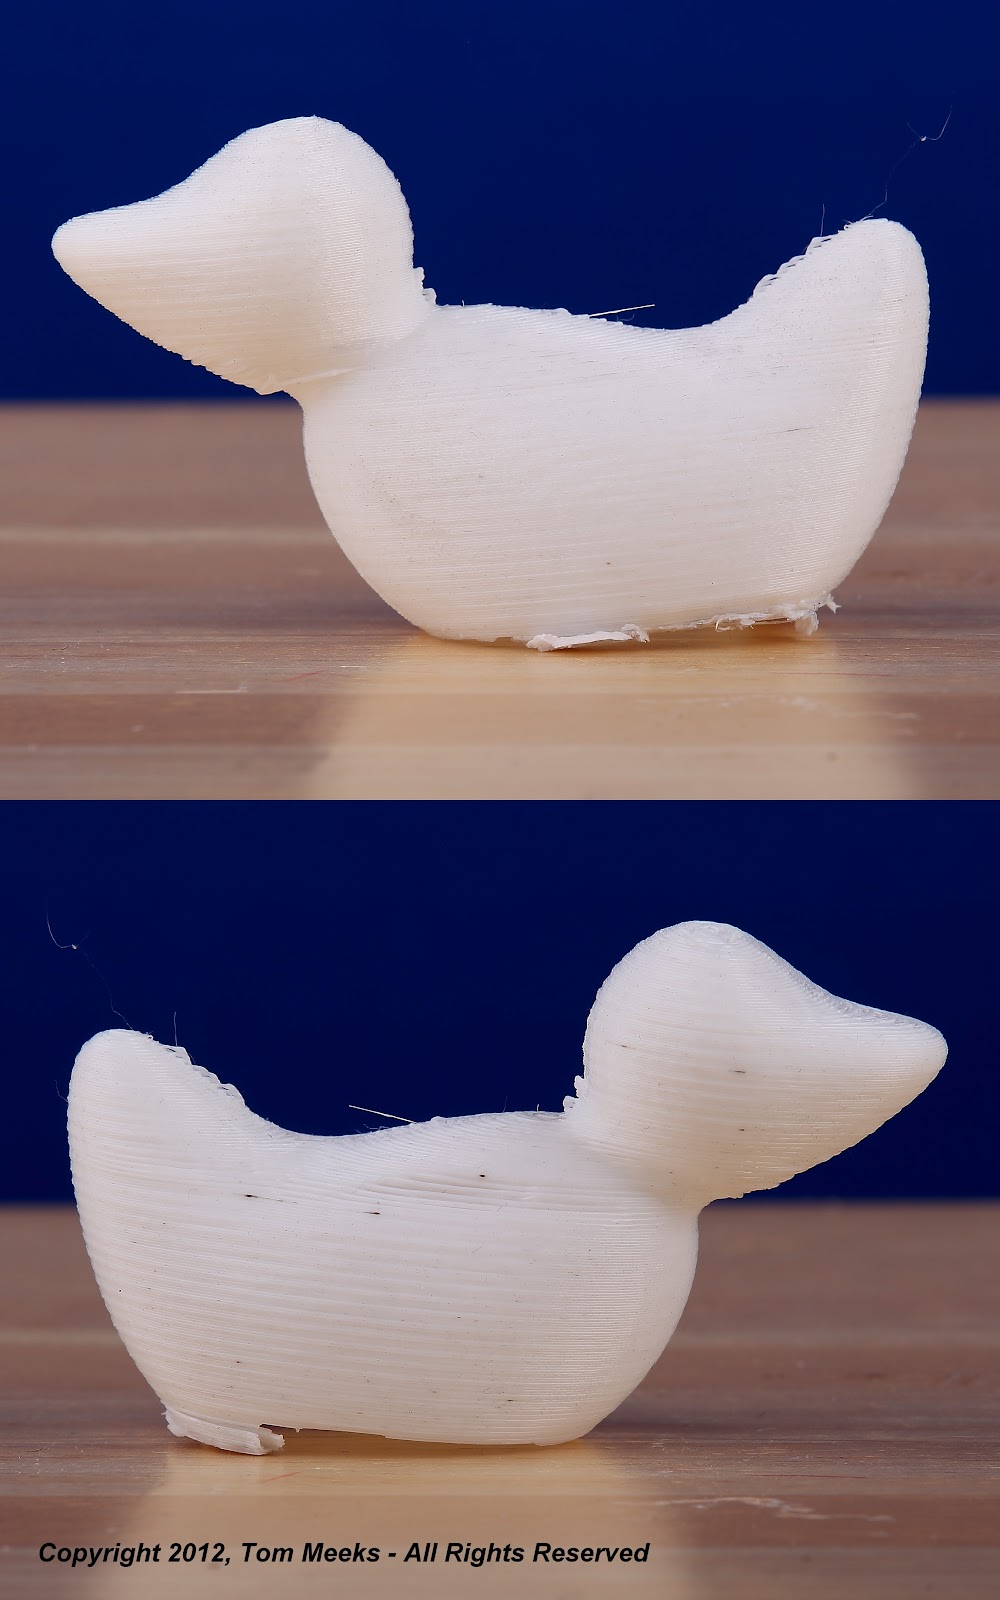
Duck Test #2
So, using both bolts in the back of the adjustable bed, I raised the back one quarter turn on each bolt.  As you can see, it's better.  But, notice what happened to the raft.  It stuck to the table so firmly that I had to run out and buy a razor blade holder.  Even then I practically destroyed the duck in the process of removing it.

SO... I ADJUSTED THE BOLT ON THE EXTRUDER HEAD TO LOWER THE BED RELATIVE TO THE HOT END

Starting again, and thinking if a little good, then more is better, I loosened the bolts in the back a bit more.  WHOOAAAA!  NOT good, as you can see from the third test.

Duck Test #3

This was NOT due to adjusting the entire bed lower.  It was due to raising the back of the bed too much.
Of course, this prompted me to come up with a better way to level the entire bed before going on to the next test.  I will talk about the method I came up with in another post.  But, for now, it is enough to say that I came much closer to getting the bed level on the next pass.

Duck Test #4

Now, we are getting somewhere.  We are very close to honing in on the right bolt tension to level the bed.  But, as you can see, the back side of the duck STILL has some issues that are not apparent on the front side of the duck.

So, I loosened the back bolts by 1/6 of a turn on both sides.

Duck Test #5
At this point, it loos like we are going in the wrong direction.  But, pushing onward, it seemed like a good idea to adjust just one bolt, since the roughest parts were at the head end.  So, the left bolt was loosened another 1/6 turn.  And, another print was tried.

Duck Test #6

The great thing about this test, is that it made it apparent that bringing the bed up in the back was probably NOT the right solution.  In fact, it seems to be making the problem worse.  So, just before I left home this morning, I took the bolts back to their original position and TIGHTENED the back bolts by 1/6 turn.

We'll see how that works.  But, it is clear that leveling the bed is not only tricky; but, vital if we want to have perfect 3D prints.  And, observing the results above, my thinking is that LOWERING the back part of the best might result in smoother layers after all.  We'll see.

But, there is another observation I'd like to make.  That is the fact that looking at the raft for each duck can tell us a lot.


The raft at the right was created with Duck Test #3.  The black tint comes from the fact that there was some residual black left in the extruder.  The important thing to note with Duck #3 is how WIDE the raft filaments are in comparison with the other rafts.  This is because the hot end was too close to the best for that run.  And, it made it VERY difficult to remove.  By, test 5 I'd realized that the 70mm bolt should be lowered more.  But, the filament is still a little fat.  Test #6, was much better, except for a fat section as the print started.  I'm not sure why that happened.  But, both #5 and #6 were much easier to remove than earlier test runs.  It seems to me that a dedicated post related to what a raft might be able to tell us is in order.

But, for now, the leveling quest is continuing.  Stay tuned for tonight's result!  I've really enjoyed this quest and I hope it is helpful to all those trying to set up a RepRap or RapMan 3D printer.


Wednesday, February 15, 2012

RapMan 3.2: The Build Experience - Part 2

Well... it didn't take me long to find out that living in the USA poses some challenges in building a product from a factory located in Great Britain.

It actually has nothing to do with Bits from Bytes and everything to do with the fact that the United States is still not a metric nation.  Do you know how difficult it is to find a metric wrench under 6mm?  I didn't either.  But, I do now.  So, I have some advice...

If you live in the USA and you order a RapMan printer, I urge you to also purchase the RapMan Custom tool kit that they also offer for sale.  Doing so will save you a LOT of time, trouble and probably money.


But, if you have ordered the Kit and not already purchased the RapMan Toolkit, then I hope I can save you at least a little aggravation and time by pointing you to places where you can purchase the tools you need.  Just don't expect to get them all in one place.

SMALL METRIC WRENCHES

Neither Sears, nor any of the big box hardware stores normally carry metric wrenches below 6mm.  However, in some stores and online they do carry a Craftsmen 10 piece metric ignition wrench set.  It includes sizes: 4, 4.5, 5, 5.5, 6 thru 11mm and sells for $19.99 at the time this is being written.


I found a single Sears store that carried this set within a radius of 50 miles from my zip code.  So, I looked elsewhere.

There are a few hobby stores near me.  And, I was able to find the a set of tools that contained 5 small box end wrenches in sizes 4.0mm, 4.5mm, 5.0mm. 5.5mm and 6.0 mm.  The set is also sold through Amazon as the #60008 21 PIECE MINI;TOOL SET EXCEL.


Fortunately, there is a Grainger near me and they just started carrying metric tools from ACU-MIN or Moody Tools.  Here is the link to a set of 8 wrenches that cover sizes 2.5mm, 3mm, 3.2mm, 4mm, 5mm, 5.5mm, 6mm and 7mm. and what this set looks like.


This set is a higher quality than others and goes for $43.40.

Another alternative for metric box wrenches from 6mm and up are automotive stores.  Here is a 6mm wrench by Autocraft that is sold through Advanced Auto Parts.  This is part AC376 6mm wrench..


They can be purchased individually or in sets.  Here is a set of metric wrenches that ranges from 8mm to 15mm.


Pricing on Autocraft parts varies, apparently, by location.

BALL-HEAD METRIC HEX WRENCHES

I could find metric hex wrenches relatively easily.  However, that is NOT exactly what you need to complete a RapMan build.  What you REALLY need are BALL-HEAD metric hex wrenches.  And, finding these took me a lot of time and even more luck.  I was looking for a set of small metric ignition wrenches when I went into Advanced Auto Parts.  That is where I stumbled across a set of metric ball-head hex wrenches with every size that one needs to complete a RapMan build!

Finding the AC456 Autocraft 10-Piece Metric Hex Key Set Long Arm (Ball Head) made my day.


It includes the following sizes... 1.27mm, 1.5mm, 2mm, 2.5mm, 3mm, 4mm, 5mm, 6mm, 8mm 10mm.  These cover, I believe, ALL the sizes we need to complete our build.  The reason for the need of Ball-Head hex wrenches is due to the fact that some of the set screws that are used cannot be tightened from directly above.  They have to be accessed from the side.

CONCLUSION

While it is possible to locate the proper tools to put together a RapMan 3D Printer in the USA, it is not as straightforward as it might be in Europe where metric is the standard for tools.  So, ordering the RapMan custom tool set should save you a LOT of running around.  And, it will put everything you need right in front of you in one compact package.

RapMan 3.2: The Build Experience - Part 1

While I have watched, for a long time, the development of the RepRap 3D printers, I resisted the urge to buy one because I'm more interested in PRINTING in 3D than BUILDING a 3D printer.

Let's face it.  It IS quite an undertaking.

But, because I want to be ready for the Cube, when it arrives later this year, I thought it wise to bite the bullet, buy a RapMan 3.2 kit and build one.  Had I opened the box before making the commitment to buy I think my instincts for laziness would have kicked in immediately and I would not have been writing this series of articles.

There are a LOT of parts in that box!!!

I had hoped that a friend, who is inclined to build things, would be able to help me out.  But, he's busy building much more important things that will allow schools to send experiments into space.  So, that evasive idea fell apart.  Thus.... I forged ahead.

Thankfully, the documents and 3D active images that you can download from the Bit From Bytes site are very well done.  And that helped boost my confidence a bit.  But, it is STILL a big job.  So, I decided that organizing the process was my only hope.

Craft stores carry small bags meant to sort beads.  So, I purchased some of those to hold the parts and hardware.  Using a Dymo LabelWriter printer, each part was labeled and bagged.  Then I arranged the bags in order of the identification numbers in the RapMan documentation.    


I felt this was more helpful than trying to find the parts in the sheets, from which they are cut, as I was building.  The sheets are large and would also limit my build area.  As it is, I am using a 4'x8' table along with two other small tables.  As I said, there are a LOT of parts to a RapMan.

By the way, I also felt that it would ultimately save time if I put the correct bolt/washer/nut combinations together as I bagged the variously sized bolts so that I don't have to go hunting for the right combinations during the subsequent build process.  In the USA, we are not as familiar with metric sizes.  So, sorting ahead of time and having a separate bag for each size is probably going to be helpful.

I've finally gotten to the point where I THINK the task is organized enough to proceed.  Sorting, as I have, also let me find that I'm missing one 3M Nylon washer, which I can easily pick up locally.  And, it's also been helpful in identifying ALL the tools I will need to proceed.  So, at least for now, taking the time to sort, bag and label seems like a good idea.  We'll see how much it helps or hurts as I dive into the real work of building a RapMan.

And, that begins in earnest this evening.  Wish me luck.  I'll need it!  :)

Thursday, May 24, 2007

3D Printing is Coming Your Way!


Make no mistake about it. 3D printing is on the way to our desktops.

This blog is being created as a place where we can follow the development of Desktop 3D as news and low cost products are released. Right now, we know about several potential candidates for that desk space now occupied by other, less fun, items.

Among the Build-It-Yourself candidates are the Fab@Home project (www.fabathome.com), RepRap (http://reprap.org). We even have an 'Evil Mad Scientist' creating a 3D printer that relies on sugar as the media! And, I'm sure more are on the way.

But, we'll also be following commercial 3D Printers. Two relatively low-cost 3D printers are nearing their target dates for shipping, Desktop Factory and the V-Flash from 3D systems. Information about both is rather sparse right now. But, we have been able to learn a few facts about the Desktop Factory and have obtained some new images which we will share. The image at the top of the post is the latest avaialable for the Desktop Factory.

We understand that the Desktop Factory is actually going to be introduced at the target price at $4,995. This quickly raised its profile on our radar screen! Initially they stated a range of between $5,000 and $7,500. That savings of $2,500 adds up to a lot of materials for experimentation! We like that.

There is something a bit odd about the image of the Desktop Factory printer that we obtained. The buttons and display just don't seem 'real' enough. And, we'd feel a bit better if there was some loose powder in the chamber. But, we'll take what we can get right now and this is the best we have at the moment.